 News Home
 {{blogcategory.sCategoryName}}
Recent posts

Geek Chic
How to Improve Your AI Outputs
11 October 2026

Geek Chic
Make Underwater City Characters Come Alive with Talking Photos
10 October 2026

Hit the Road
How to Rent a Car in Dubai Without Paying a Security Deposit
06 October 2026

Hit the Road
A Travel Guide to Renting and Driving in Morocco's Biggest City
06 October 2026
Popular posts
Extravaganza
Trending Music Hashtags To Get Your Posts Noticed
24 August 2018
Geek Chic
How To Fix iPhone/iPad Only Charging In Certain Positions
05 July 2020
Extravaganza
Trending Wedding Hashtags To Get Your Posts Noticed
18 September 2018
Money Talks
How To Find Coupons & Vouchers Online In South Africa
28 March 2019
How To Setup OpenAI ChatGPT Ads Measurement Pixel
16 August 2026 | 0 comments | Posted by Che Kohler in nichemarket Advice
Now that an ad network operating within platforms like ChatGPT has become a new acquisition channel, it's natural to allocate budget to it becomes part of the conversation for marketers.
Suggesting ChatGPT ads to your line manager or client requires you to put in place some form of measurement to track performance. Thankfully, OpenAI has thought of this, copying popular ad platforms like Google and Meta and releasing an ad pixel.
- Manual Direct Script Code Installation
- Custom HTML Tag Implementation via Google Tag Manager (GTM)
- Template-Based Deployment using the Community GTM Tag Template
Technical Overview & How the OpenAI Pixel Works
oaiq(). It captures a first-party tracking cookie called __oppref containing an operational privacy-preserving click identifier (oppref), records page origins, and automatically handles event batching. +-----------------------------------+ | ChatGPT Ad Click | +-----------------------------------+ | v +-----------------------------------+ | Landing Page (URL containing | | ?oppref=...) | +-----------------------------------+ | v +-----------------------------------+ | OpenAI Measurement Pixel SDK | | Stores __oppref Cookie | +-----------------------------------+ | +-----------------+-----------------+ | | v v +---------------------------+ +---------------------------+ | Standard Event Hits | | Custom Event Hits | | (order_created, lead, etc)| | (quote_requested, etc) | +---------------------------+ +---------------------------+ Supported Standard Events & Data Shapes
| Data Shape Type | Target Events | Primary Fields |
contents | page_viewed, contents_viewed, items_added, checkout_started, order_created | amount, currency, contents: [{id, name, quantity, amount}] |
customer_action | lead_created, registration_completed, appointment_scheduled | amount (optional), currency (optional) |
plan_enrollment | subscription_created, trial_started | plan_id, amount, currency |
custom | Custom user-defined actions | type: "custom", requires custom_event_name in options |
Method 1: Manual Code Snippet Installation
Step 1: Add the Base SDK Script
<head> tag on every page of your site. Replace <YOUR-PIXEL-ID> with your Pixel ID generated from the OpenAI Ads Manager.<script> (function (w, d, s, u) { if (w.oaiq) return; var q = function () { q.q.push(arguments); }; q.q = []; w.oaiq = q; var js = d.createElement(s); js.async = true; js.src = u; var f = d.getElementsByTagName(s)[0]; f.parentNode.insertBefore(js, f); })(window, document, "script", "https://bzrcdn.openai.com/sdk/oaiq.min.js"); oaiq("init", { pixelId: "<YOUR-PIXEL-ID>", debug: false // Set to true during testing to output logs to console }); </script> Step 2: Configure Consent Controls
<script> // Default to false if consent is required and not yet given oaiq("consent", false); oaiq("init", { pixelId: "<YOUR-PIXEL-ID>" }); // Execute this callback after the user grants consent in your CMP banner function onUserAcceptsCookies() { oaiq("consent", true); } </script> Step 3: Pass User Data for Enhanced Advanced Matching
init call. Note: Hash emails and external IDs using lowercase SHA-256 before passing them. Raw personal information is strictly prohibited.oaiq("init", { pixelId: "<YOUR-PIXEL-ID>", user: { email_sha256: "b4c9a289323b21a01c3e940f150eb9b8c542587f1abfd8f0e1cc1ffc5e475514", external_id_sha256: "73d83a078369bb4f0971b317aa7797a91cf5c0df1b62161c2e47d75c33ab5b6e", country: "US", city: "san francisco", zip_code: "94107" } }); Step 4: Fire Conversion Events
oaiq("measure", ...) function:// Example 1: E-commerce Order Completion oaiq("measure", "order_created", { type: "contents", amount: 2599, // Integer or numerical value currency: "USD", contents: [ { id: "sku_123", name: "Starter Bundle", content_type: "product", quantity: 1 } ] }, { event_id: "order_12345" // Optional server-side deduplication ID }); // Example 2: Custom Event Setup oaiq("measure", "custom", { type: "custom" }, { custom_event_name: "quote_requested" } ); Method 2: Manual Installation via Google Tag Manager (Custom HTML)
Step 1: Create the Base Pixel Tag
- Open your GTM Web Container.
- Click Tags > New, and name it
OpenAI Pixel - Base Script. - Choose Custom HTML as the Tag Type.
- Paste the initialisation snippet into the HTML field:
<script> (function (w, d, s, u) { if (w.oaiq) return; var q = function () { q.q.push(arguments); }; q.q = []; w.oaiq = q; var js = d.createElement(s); js.async = true; js.src = u; var f = d.getElementsByTagName(s)[0]; f.parentNode.insertBefore(js, f); })(window, document, "script", "https://bzrcdn.openai.com/sdk/oaiq.min.js"); oaiq("init", { pixelId: "YOUR_PIXEL_ID_HERE" }); </script> - Under Triggering, select Initialisation - All Pages (or Consent Initialisation - All Pages if integrating with a CMP).
- Save the tag.
Step 2: Create Standard and Custom Event Tags
- Click Tags > New, and name it
OpenAI Pixel - Event - Purchase. - Select Custom HTML and paste your event tracking script referencing GTM Data Layer Variables:
<script> window.oaiq && window.oaiq("measure", "order_created", { type: "contents", amount: {{dlv - Order Total}}, currency: "{{dlv - Currency}}", contents: [ { id: "{{dlv - Product SKU}}", content_type: "product", quantity: {{dlv - Quantity}} } ] }, { event_id: "{{dlv - Transaction ID}}" }); </script> - Under Advanced Settings > Tag Sequencing, check Fire a tag before OpenAI Pixel - Event - Purchase fires and select your
OpenAI Pixel - Base Script. - Add your trigger (e.g., Custom Event trigger matching
purchaseor pageview trigger for thank-you pages). - Save and Publish.
Method 3: Simplified Setup via Google Tag Manager Community Template
+-----------------------------------------------------------------+ ¦ Google Tag Manager Container ¦ ¦ ¦ ¦ +---------------------------------------------------------+ ¦ ¦ ¦ OpenAI Ads Pixel Tag Template ¦ ¦ ¦ ¦ ¦ ¦ ¦ ¦ Pixel ID: [ YOUR-PIXEL-ID ] ¦ ¦ ¦ ¦ Event Setup: Inherit from DataLayer / Override ¦ ¦ ¦ ¦ [X] Enable Automatic GA4 Mapping ¦ ¦ ¦ ¦ [X] Enable Google Consent Mode (ad_storage) ¦ ¦ ¦ +---------------------------------------------------------+ ¦ +-----------------------------------------------------------------+ Step 1: Add the Template to Your Container
- Navigate to Templates in the GTM sidebar.
- In the Tag Templates box, click Search Gallery.
- Search for OpenAI Ads Pixel (e.g., OpenAI Ads Pixel by Stape) and click Add to Workspace.
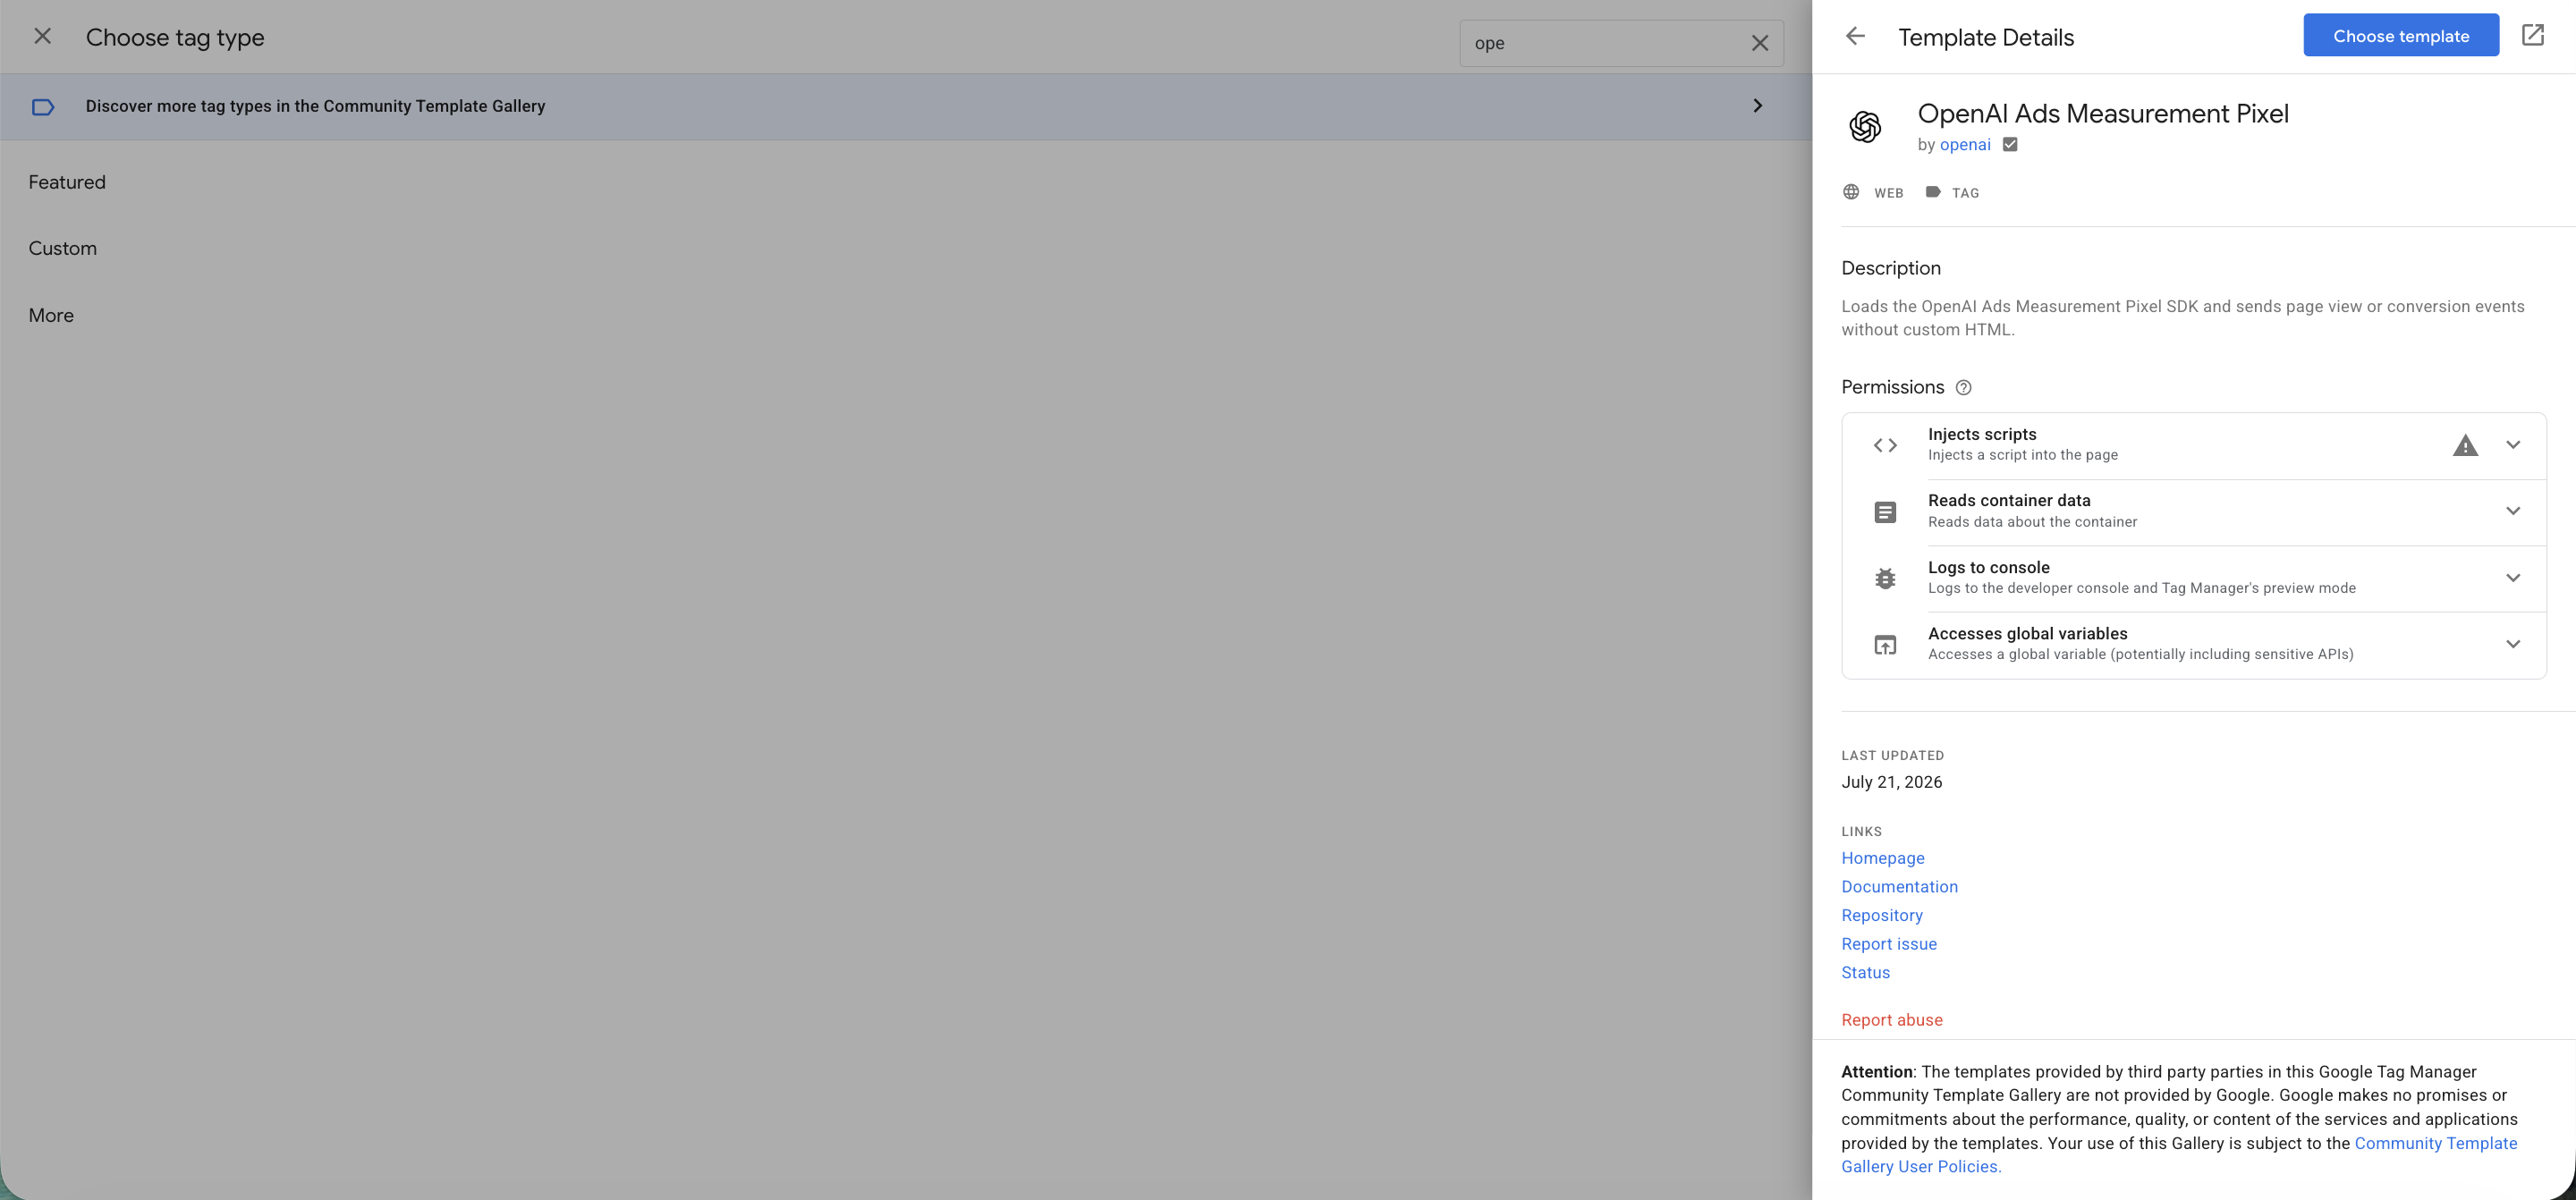
OpenAI Ads Pixel Template in Google Tag Manager
Step 2: Configure the Main Pixel Tag
- Go to Tags > New and set the Tag Type to OpenAI Ads Pixel.
- In the Pixel ID field, paste your OpenAI Pixel ID.
- Select your Event Name Setup Method:
- Inherit from DataLayer: Automatically maps standard GA4 events (e.g.,
add_to_cart,begin_checkout,purchase) directly to their OpenAI equivalents (items_added,checkout_started,order_created). - Override: Manually select a specific standard OpenAI event or define a custom event name.
- Enable Automatic Event Parameters Mapping. This allows the tag to parse GA4 e-commerce objects, populating
amount,currency, and item contents automatically.
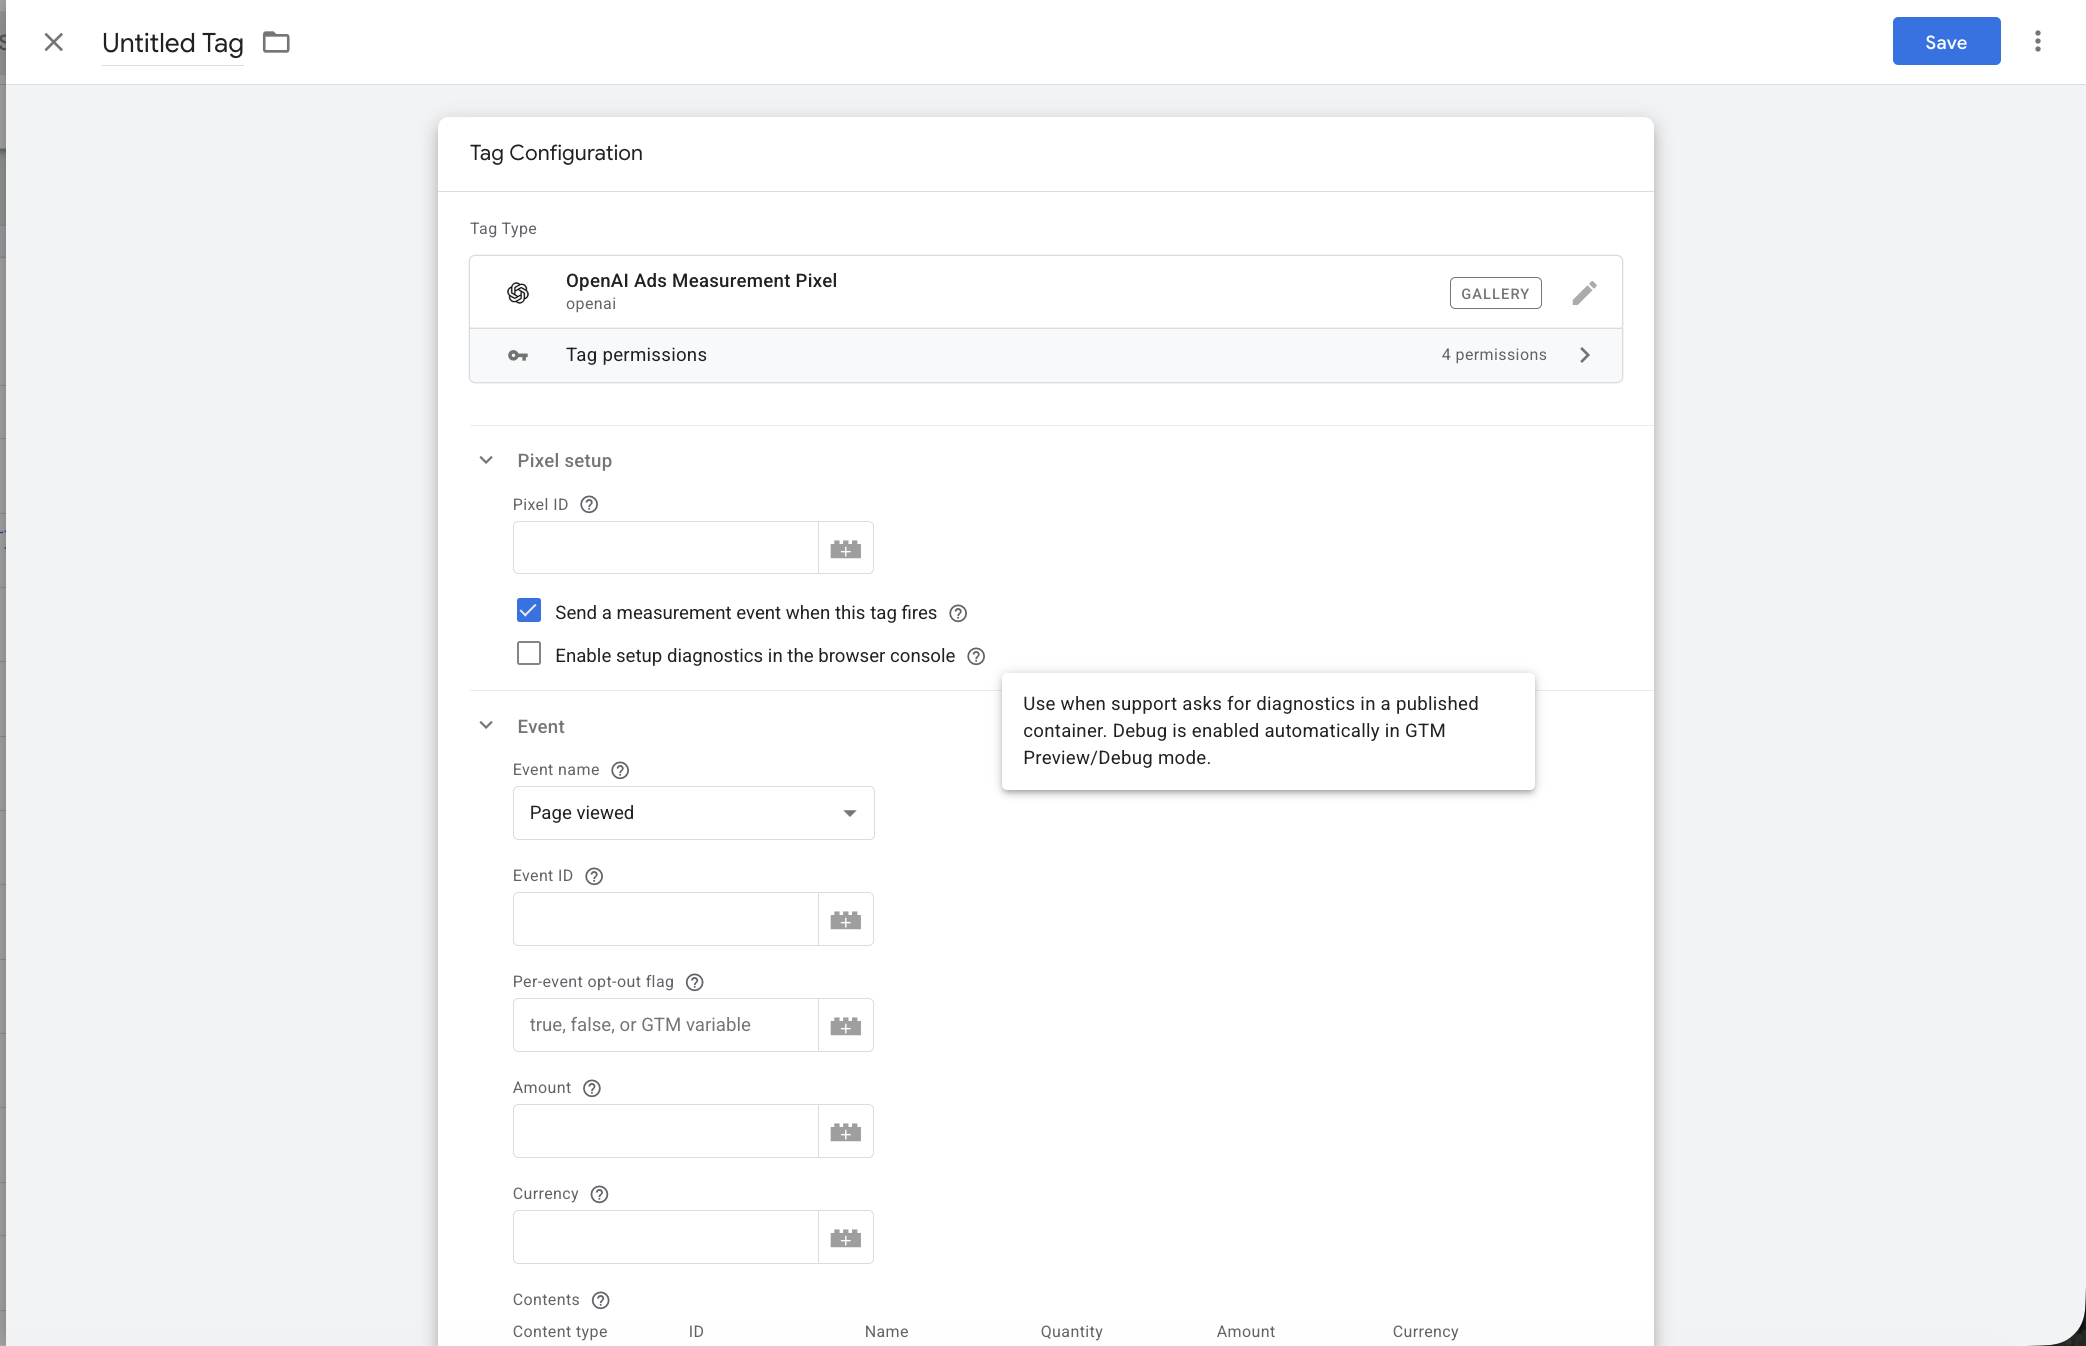
ChatGPT/OpenAI Tag Template Settings in Google Tag Manager
Step 3: Configure Consent & Advanced Matching
- Google Consent Mode: Check the option to enable GTM Consent Mode support. When
ad_storageconsent is denied, the tag prevents script loading until the user explicitly grants permission. - Advanced Matching: Under the user parameters section, map variables for
email_sha256or external customer IDs to enhance conversion attribution rates.
Step 4: Attach Triggers
- Use Initialisation - All Pages to fire base page view calls.
- Use specific Custom Event Triggers (e.g.,
purchase,generate_lead) to fire conversion events.
Technical Considerations & Best Practices
1. Content Security Policy (CSP) Headers
| Directive | Source URL | Purpose |
script-src / script-src-elem | [https://bzrcdn.openai.com](https://bzrcdn.openai.com) | Loads the oaiq.min.js SDK library |
connect-src | [https://bzr.openai.com](https://bzr.openai.com)[https://bzrcdn.openai.com](https://bzrcdn.openai.com) | Sends conversion pings via fetch/sendBeacon and fetches configuration |
img-src | [https://bzr.openai.com](https://bzr.openai.com) | Supports fallback image pixel requests when script transport is restricted |
Content-Security-Policy: default-src 'self'; script-src 'self' 'nonce-2726c7f26c' https://bzrcdn.openai.com; connect-src 'self' https://bzr.openai.com https://bzrcdn.openai.com; img-src 'self' https://bzr.openai.com; 2. Deduplication Between Browser (Pixel) and Server (Conversions API)
event_id payload property across both channels:// Browser Pixel Call oaiq("measure", "order_created", { type: "contents", amount: 2599, currency: "USD" }, { event_id: "order_unique_98765" // SHARED UNIQUE ID }); 3. Debugging and Verification
- Enable Console Debug Logs: Set
debug: truein youroaiq("init", ...)configuration or check JS SDK Debugging Logs within the GTM template to view payload outputs directly in the Developer Tools console. - Check Cookie Storage: Verify that the
__opprefcookie is set correctly upon visiting landing pages containing ad tracking parameters. - Network Tab Inspection: Look for outbound
POSTorGETrequests targeting[https://bzr.openai.com](https://bzr.openai.com)with 200 HTTP response codes.
Need Help With Your Tracking?
If this all sounds like too much of a headache and you'd much prefer a tracking expert to set up your ad account pixel, reach out to us and we'll get you set up.You might also like
How to Rent a Car in Dubai Without Paying a Security Deposit
06 October 2026
Posted by Abdulhafeez Yusuf in Hit the Road
Skip the blocked card and the long wait for your money back. Learn how no deposit car hire in Dubai works, what it costs, and how to book.
Read moreMake Underwater City Characters Come Alive with Talking Photos
10 October 2026
Posted by Staff Writer - Pippit in Geek Chic
How to use an AI image, auto & video generative tool like Pippit to create an underwater world inspired by your creative input from image uploads to ...
Read more
{{comment.sUserName}}
{{comment.iDayLastEdit}} day ago
{{comment.iDayLastEdit}} days ago